This craft was originally published in June 2016 and has been updated and republished for you today.
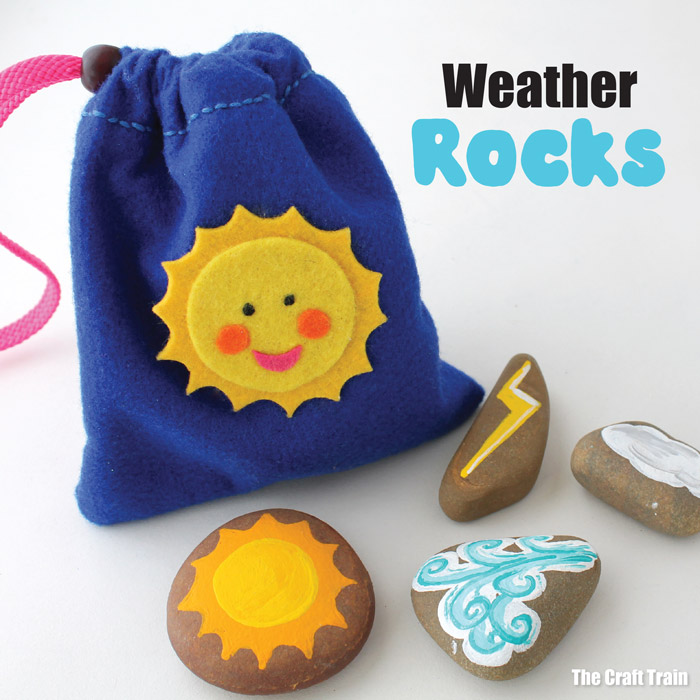
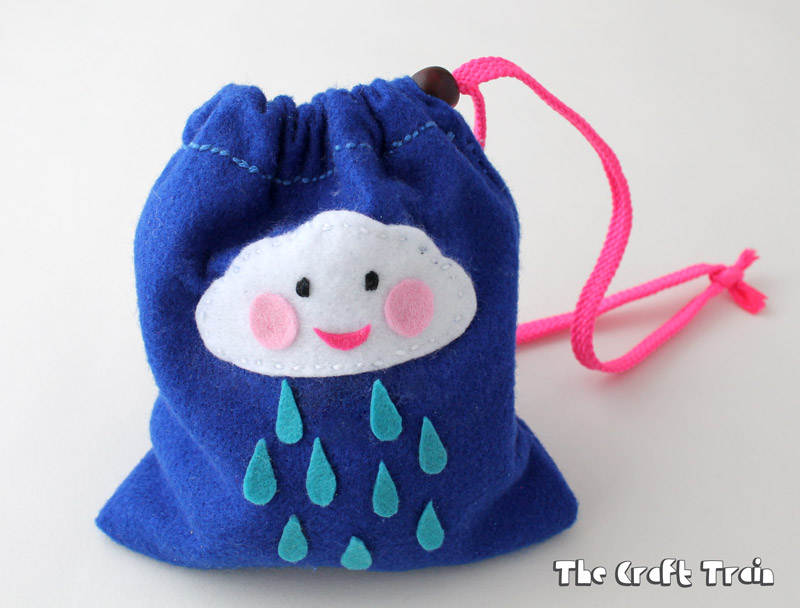
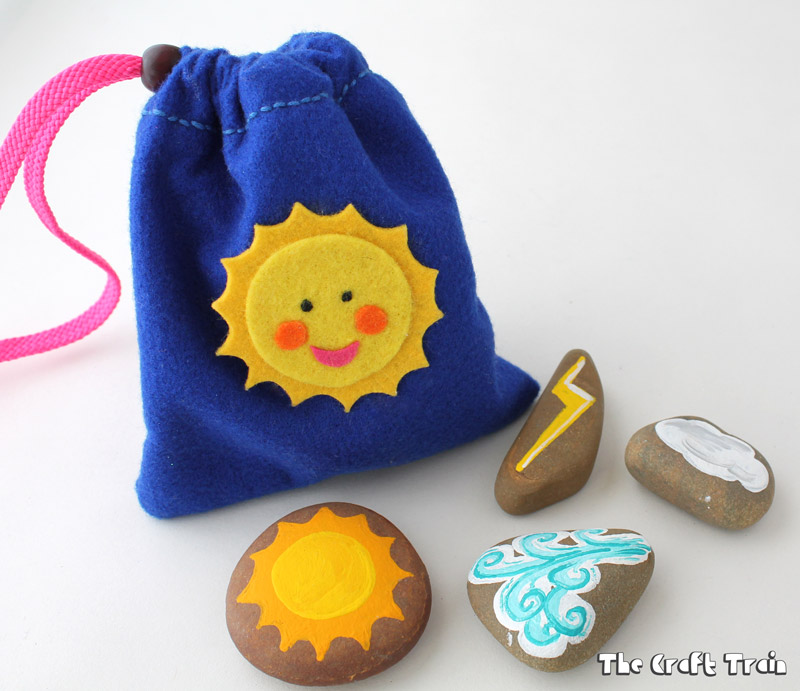
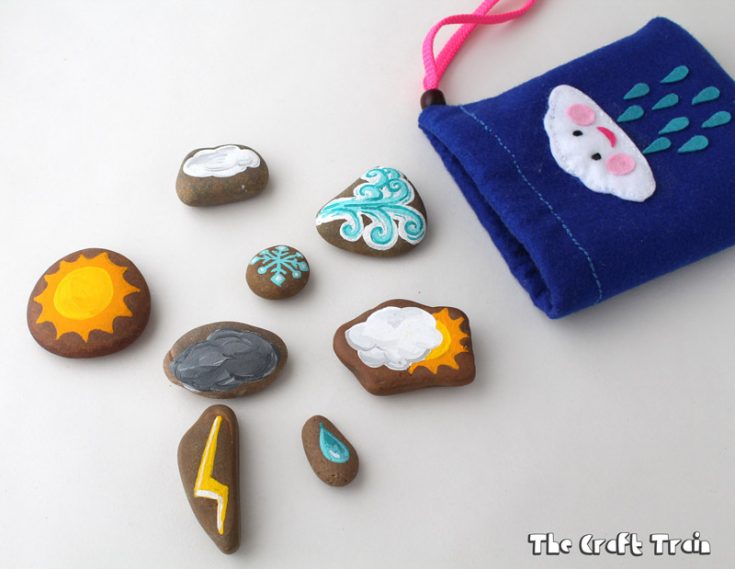
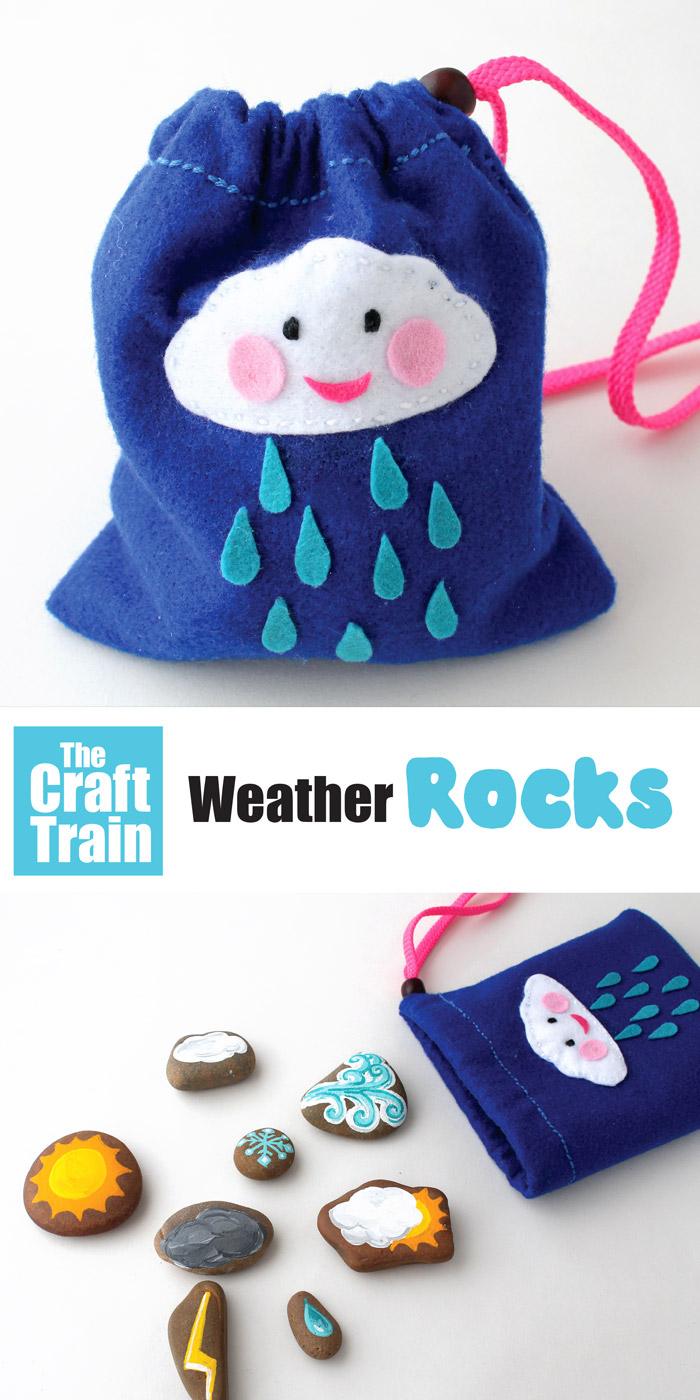
Make some colourful rock art weather stones in a simple felt drawstring bag to help kids learn about weather.
The weather is such a changeable thing. Last week we were in Hawaii on a family holiday, enjoying gorgeous Summer weather interspersed with frequent tropical downpours and strong Hawaiian trade winds. The showers were almost always followed by a rainbow, and I think I saw more rainbows in two weeks on Hawaii that I would all year here at home. This week we’ve come home to a Blue Mountains Winter and the first real cold snap of the season – brrrr! I actually designed this stone craft for my kids before we went away but now on returning from our trip it seems even more appropriate.
Weather stones are a DIY toy designed for creative play, but they could also be useful in helping younger kids learn and understand about our changing weather. My own girls are bigger now and they like to use their rocks in ways I’d not thought of myself. For example, they make up a story incorporating some of their favourite toys where some special magic stones get stolen by one of the characters and need to be rescued back again. So they also work as story stones, and story stones are great for school aged kids as well as preschoolers.
It’s a simple craft, the most complicated thing about it is sewing the felt drawstring bag. Note that this is my first ever sewing craft on the blog (in fact it’s my first sewing craft since year seven in high school where I made a very dodgy-looking pair of shorts) so you’ll have to be a little forgiving of my messy beginner stitches.

How to use weather stones:
- For preschoolers and toddlers, make it part of the morning routine to look outside and see what the weather is like then select the matching stone. This might help them decide what clothes to choose.
- Add them into a weather-themed sensory bin
- Include them as a part of a small world set up to invite imaginary play
- Use them as story stones. Choose a stone from the bag and then tell or write a story about that stone
- For older kids, place them on the shelf and let them use them in open-ended imaginary play of their choosing
How to make weather stones
You will need:
• Flat stones – we collected a few from out last trip to the river where we made some earth art
• Paints and brushes – I always use Jo Sonjas acrylic paint, or a similar good quality paint
• One sheet of standard sized soft felt
• Assorted felt scraps in suitable colours
• Embroidery thread and needle
• Fabric glue
• Double sided tape
• Shoelace or ribbon to use as a drawstring
• A wooden bead with a wide hole to close the bag
• The printable Sun and Cloud template
Making the bag:
Since I am new to sewing I have very little knowledge on how to hand stitch correctly. My daughter owns copy of Sew Together Grow Together by Trixi Simmonds of Coloured Buttons blog. This is where I found the instructions on how to do both backing stitch and running stitch which I’ve referred to in the instructions below. If you are a beginner sewer like me and would like inspiration for fun sewing crafts that you can do together with your kids I’d highly recommend this book.
- Fold the longer edge of the felt over and sew it down using backing stitch to create the tunnel for the drawstring to go through. The width of my fold is approx 2.5cm.
- Fold it in half as you would a book, keeping the tunnel stitches on the outside so it looks inside out. Stitch along the bottom and up one side (the other side is the fold), also using backing stitch. I have to admit that this was the first time I’ve ever attempted backing stitch and I found it to be EASY and strong enough to hold the rocks securely once you place them in the bag.
- Once you’ve sewed the edges together turn it inside out and you have a bag.
- To thread the shoelace through the tunnel pin a large safety pin to one end of the lace, this way you will be able to push it through easily. Thread your bead over both ends of the shoelace, tie in a secure double knot to stop the bead slipping off the end and trim the ends. Make sure you leave enough length to open and close the bag properly and a bit extra for the handle.
- Print out your sun and cloud template. Stick them to felt with a bit of double sided tape and cut out the designs with the paper attached to the felt (it works great this way). Cut out the larger shapes of the sun and cloud using the template but it is easier to cut the smaller shapes out freestyle without bothering with the paper because they are so fiddly. You can use the faces and raindrops on the printable as more of a guide.
- Sew the larger shapes on using running stitch, and glue the smaller shapes on using fabric glue.
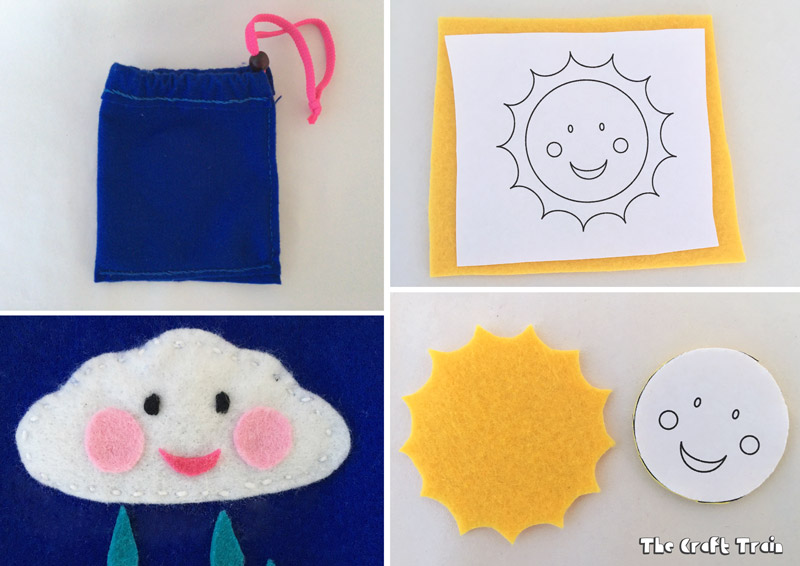
You might notice that my sun is glued on instead of sewn. I attempted gluing the shapes on before I decided to sew them on but I found that with the rocks inside the cloud began to peel off, and sewing has worked far better.
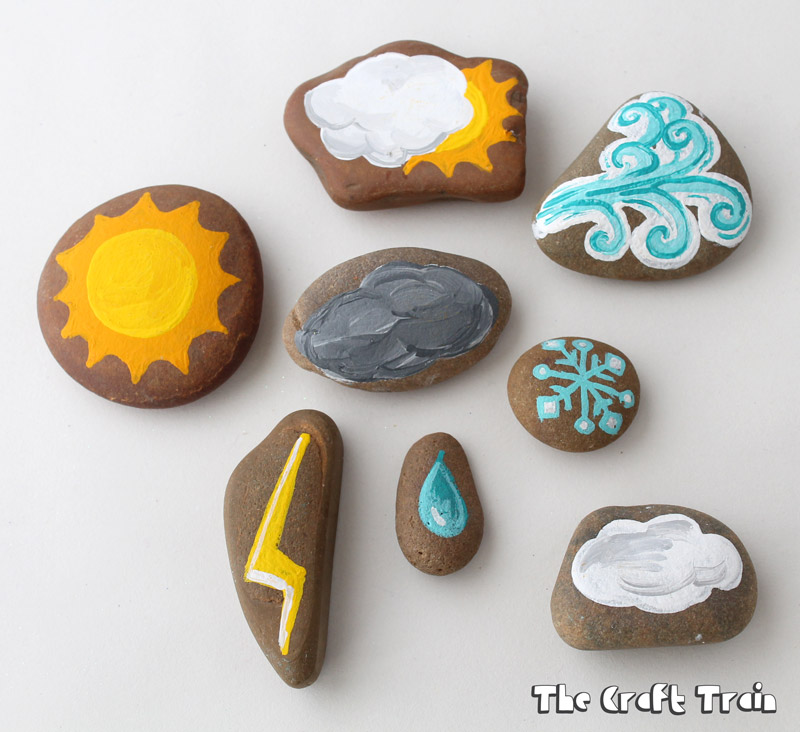
Making the stones
Paint your rocks with weather designs. I’ve made a sun, a sun behind a cloud, a snowflake, a raindrop, wind, a lightning bolt and a rain cloud. I completely forgot to paint a rainbow but you could add one in as a nice addition to the set.
The girls are very happy with their weather stones and I’m pleased with my beginner sewing project too. I think I might even have caught the sewing bug, because now I realise how easy it is I can’t wait to attempt a few more ideas.
Weather stones
Weather stone craft / DIY toy to help kids learn about the weather
Materials
- Flat medium sized stones
- Good quality acrylic paint
- One sheet of standard sized soft felt
- Assorted felt scraps in suitable colours for sun and cloud with raindrops
- Embroidery thread
- Fabric glue
- Double sided tape
- Shoelace or ribbon to use as a drawstring
- A wooden bead with a wide hole to close the bag
- The printable sun and cloud template
Tools
- Sewing needle
- Needle threader
- Sewing pins
- Scissors
- Paint brushes in various sizes
Instructions
- Fold the longer edge of the felt over and sew it down using backing stitch to create the "tunnel" for the drawstring to go through. The width of my fold is approx 2.5cm.
- Fold the felt in half as you would a book, keeping the tunnel stitches on the outside so it looks inside out. Stitch along the bottom and up one side (the other side is the fold), also using backing stitch.
- Once you’ve sewed the edges together turn it inside out and you have a bag.
- To thread the shoelace through the tunnel pin a large safety pin to one end of the lace, this way you will be able to push it through easily. Thread your bead over both ends of the shoelace, tie in a secure double knot to stop the bead slipping off the end and trim the ends. Make sure you leave enough length to open and close the bag properly and a bit extra for the handle.
- Print out your sun and cloud template or design your own. Stick them to felt with a bit of double sided tape and cut out the designs with the paper attached to the felt (it works great this way). Cut out the larger shapes of the sun and cloud using the template but it is easier to cut the smaller shapes out freestyle without bothering with the paper because they are so fiddly. You can use the faces and raindrops on the printable as more of a guide.
- Sew the larger shapes on using running stitch, and glue the smaller shapes on using fabric glue.
More craft ideas using stones and rocks
- Make a set of garden rocks with bugs, leaves and flowers in a drawstring bag
- Use rocks to make a village of houses which kids could use in imaginary play, inspired by the Rock Art Handbook
- Use rocks and other natural items to create earth art outdoors
- Use rocks to make ochre paint – a fun and easy art activity
- Create some simple rock cakes for pretend play
- These rock chicks are super cute and easy for kids of all ages
- Make a funny face rock puzzle – a great idea for busy bags
- Use pebbles and nail polish to decorate rocks into garden bug ornaments
There are tons more awesome rock craft ideas as well as other inspiring nature crafts on our nature crafts board on Pinterest

Hi Kate, I was just looking at all your craft projects and noticed your little bag and thought how cute!! Reading further I saw you’d mentioned my book too, thanks so much!!! I love your bag and the idea for the weather stones to put inside 🙂 Actually i love all your crafts!
Thanks Trixi, ditto!
Thank you. I made a set for my DD yesterday. She loves it and starts her weather forecast for the whole weeks 😉
Fantastic, I’m so glad she likes them, thank you for taking the time to comment 🙂
Hi there! You did very well on this project. I love it so much. You just inspired me to try it myself. I do not know much about sewing as well but seeing your work makes me think that there is a hope for me. My kids will surely love this art activity. I must say that the colors and patterns are so cute as well. Thank you for sharing.
Really fantastic blog and nice craft for weather.