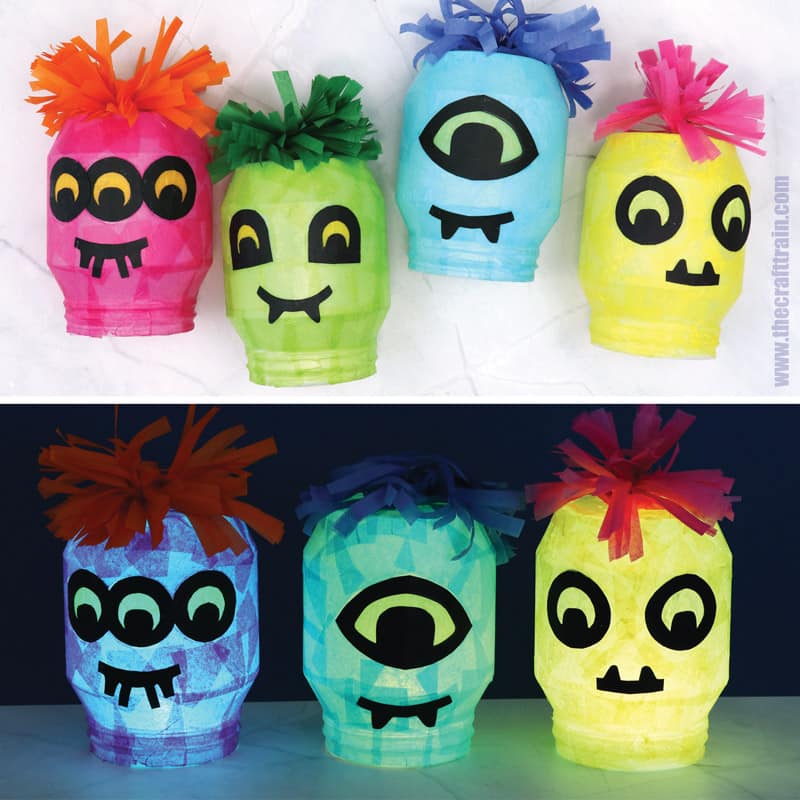
Make colourful monster lanterns to decorate for Halloween! These DIY luminaries are super-easy to make using upcycled plastic containers (or you could use large mason jars too). We’ve even included a free printable monster features template.
They look awesome after dark lit up with LED tealight candles!
You might also like these 3D monster portraits

Not long ago, we made some geometric tissue paper lanterns. These monster lanterns are another DIY luminary made using the same technique but they have a totally different look.
We’ve used DIY mod podge to glue tissue paper squares to the containers, but if you’d prefer to use real mod podge that would work great too.
Feel free to get as creative as you like when you make your monster lanterns. You can make them multi-coloured, design your own facial features (if you don’t want to use our template), and use whatever recycled plastic container you have on hand.

Ours are made from 1kg Jalna yoghurt tubs, but these may not be available where you live. A large plastic milk bottle with the top cut off would work just as well, or any large upcyled jar. If you have smaller jars, you can use those too but the printable monster features would be too big for them. To make them work, you could set print size to 70 or 50%, or design your own unique monster eyes and mouth.
Ready to get started? Here’s how.
How to make recycled monster lanterns
You will need:
- Recycled clear plastic containers (ours are 1kg yoghurt tubs) or large mason jars
- Tissue paper in assorted colours
- Black construction paper (we’ve used card stock)
- PVA glue
- Glue stick
- Scissors
- Printable monster features template – enter your email address into the form below and it will be sent direct to your inbox
How to:
Print the facial features to plain white paper. If you are using smaller containers or jars, set the page print size to a smaller percentage so they fit your container.

Cut out the eyes and mouth you want to use. Fold the black construction paper in half, then trace the outline of your shape against the fold. Cut the pieces out.
Trace around the outline of your eyes onto your container using a sharpie marker. For a seamless finish, use a marker in the same colour you plan on making the monster.

Mix PVA glue with water at a 50:50 ratio to make your own DIY mod podge. You can keep any leftover in a sealed glass jar to use on later projects.
Cut tissue paper into squares and glue them onto your container using the mod podge. Cover the entire container but leave the eyes clear.

Allow to dry, then add a final coat of mod podge to seal it (optional).
Glue tissue paper in a different colour to the backs of the eyes using a glue stick, then use straight PVA glue to glue into the eye spaces.
Glue the mouth on with PVA.

Fold a piece of tissue paper with several layers in half, then fringe it to make monster hair. Paint glue along the folded edge, roll it up, then fold the base over and glue to the top of the monster’s head.

You’re done!
Now place an LED candle underneath it and put it on the shelf or mantlepiece to decorate for Halloween.


We used colour-changing LED lights (upcycled from our egg carton coral reef project) and they have the added cool effect of colour mixing with the tissue paper.
Because of the tissue paper hair, these are only suitable tas indoor decorations. To make a more waterproof version, you could make the hair from fringed, recycled plastic bags or plastic tablecloths, and use an acrylic outdoor sealer as a final coat instead of mod podge.
More easy Halloween crafts for kids
- Make a 3D paper spider using our printable template
- These peg monsters are so cute with their fluffy yarn hair
- Upcycle a paper roll into a black cat
- Check out our Halloween paper craft bundle