This paper plate bunny craft is a fun activity for kids of all ages. It is perfect for Spring or Easter-themed crafting and would make a great classroom display with bunnies of all different colours – it would also look cute on the fridge at home!

You guys know how we love making paper plate animals!
We have a whole ebook filled with Ocean animals and dinosaurs, and today we’re bringing you a paper plate bunny.
It’s very easy to put together and gives kids a chance to practice their fine motor skills with cutting, gluing and patterning involved.
The paper plate has been decorated with a flat pastel colour which I have allowed to dry before adding simple white patterns with a cotton bud (Q-tip), and cotton ball spots for the yellow bunny. If you don’t want to wait for extra drying time just paint patterns on top of the wet colour, however the colours are likely to mix a bit in the process. Most kids probably won’t care!
The printable template includes both an all-in-one template (all elements on one page), and a teacher set which is best for crafting with a group of kids.
To use the all-in-one template, print to white paper then either cut the shapes out and trace onto coloured paper, or staple the white sheet to a sheet of construction paper in all four corners and cut the shapes out. Then cut the eye out from the white paper.
The “teacher set” has the bunny shapes on one page so they can be printed directly to coloured paper, and a sheet of eyes to be printed to white paper. This is to simplify the process for a large group of kids, but of course you can do this at home too!
How to make a paper plate bunny

You will need:
- Our printable bunny template (also available in our TPT store)
- Construction paper
- White paper
- Paper plate 18.5cm
(side plate size) - Paint
- Paint brush
- Cotton bud and/or cotton ball
- Gel pens in white and pink
- Glue stick
- Scissors
How to:
1) Print out your bunny directly onto construction paper, and the eyes onto white paper
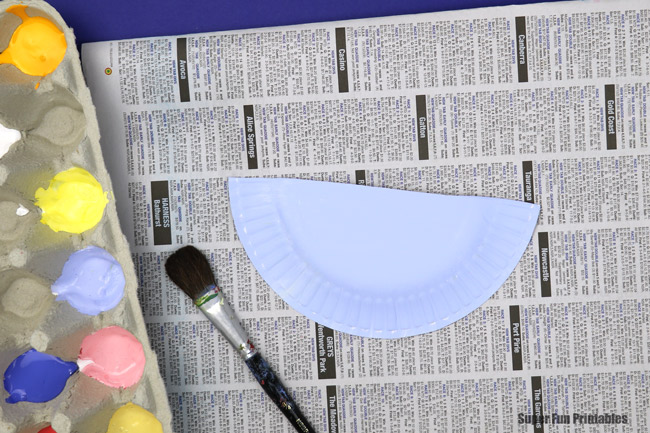
2) Cut your paper plate in half by folding in half then cutting along the fold line.
3) Paint the paper plate, allow to dry, then decorate with spots or swirls using a cotton bud or cotton ball


4) While the paper plates are drying, cut out the bunny shapes.

5) Glue the bunny head, legs and tail to the back of the plate, then turn over and glue the eye onto the bunny’s head


6) Use gel pens to draw a nose, mouth and whiskers


Aren’t they cute?
More paper plate crafts kids can make:
- Create a paper plate Ringtail possum
- This paper plate chick is so very easy, perfect for beginner scissor skills