

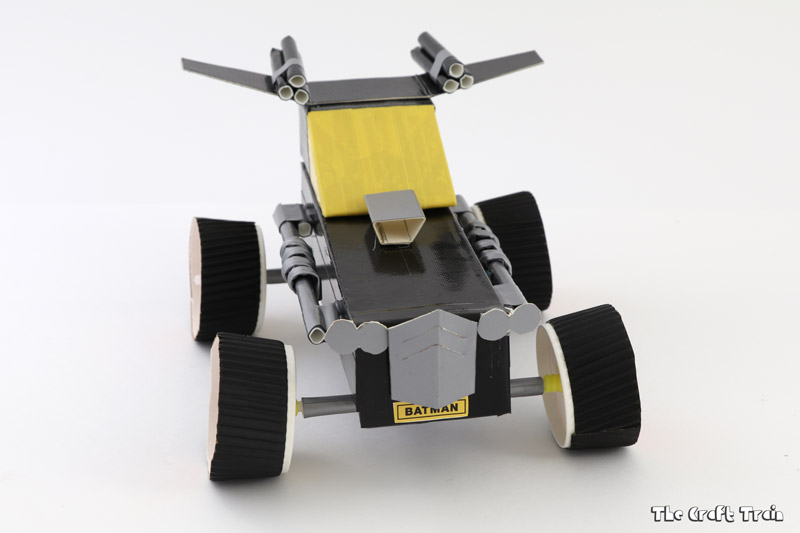
Here’s a fun idea for all the Batman and LEGO fans out there. It’s a Batmobile craft inspired by the ultra-cool looking model in the upcoming The Lego Batman Movie. It really goes too!

This post is sponsored by Warner Bros. Pictures
I have several Batman enthusiasts in our household, the biggest one being my husband! My kids also love their LEGOs, so we are all looking forward to seeing this film and if the trailer is anything to go by it’s going to be hilarious.
Here is a preview for you (you will be able to see a brief shot of the Batmobile at the start):
About The Lego Batman Movie
In the irreverent spirit of fun that made “The LEGO® Movie” a worldwide phenomenon, the self-described leading man of that ensemble – LEGO Batman – stars in his own big-screen adventure. But there are big changes brewing in Gotham, and if he wants to save the city from The Joker’s hostile takeover, Batman may have to drop the lone vigilante thing, try to work with others and maybe, just maybe, learn to lighten up.
Will Arnett reprises his starring role from “The LEGO Movie” as the voice of LEGO Batman, aka Bruce Wayne. Zach Galifianakis (“Muppets Most Wanted,” the “Hangover” films) stars as The Joker; Michael Cera (TV’s “Arrested Development”) as the orphan Dick Grayson; Rosario Dawson (TV’s “Daredevil”) as Barbara Gordon; and Ralph Fiennes (the “Harry Potter” films) as Alfred.
Rated PG
You can read more about the movie over at the Official Website. You can also like ‘The LEGO Batman Movie on Facebook, or follow on Twitter and Instagram.

Seriously, how cool does this movie look?
And now onto the craft…
How to make a Duct Tape Batmobile

You will Need:
• A large cereal box (the front panel needs to be either the same size or larger than a sheet of paper which goes through your printer)
• Duct tape in black, chrome and yellow
• Double sided tape
• Paper straws
• Cake pop sticks (or something similar like small dowel rods or bamboo skewers cut in half)
• Beads with a wide enough hole to slide over the cake pop sticks (you’ll need 8)
• Sharpie markers
• 1 pipe cleaner (perferably a thin one)
• 4 small black paper coffee cups (baby cino size, or 4oz)
• A mathematical instrument set
• A hot glue gun
• This set of printable templates (there are three pages in all)

Making the Body
Step 1 | Print out your body template (the first page) and attach it to your cereal box with a few small pieces of double sided tape. Before you cut the shape out you need to score along the fold lines by running a blunt butter knife along them using a ruler as a guide. Scoring the fold will give you a nice, straight, clean fold. It is important in this case because once you detach the template you need to know where to fold the box.
Step 2| Your shape will now be easy to fold together into the main body of the car. Stick the tabs down with double sided tape.
Step 3 | Now repeat this process to make a cabin and wing. These shapes are on the second page of your template.
Step 4| Before sticking the shapes together you need to cover them with duct tape. All shapes are completely black except for the cabin, which needs to have the pointy end covered in yellow tape first before adding black around the rest.
Step 5 | Stick the finished pieces together using double sided tape.

Making the Accessories
The Batmobile is now ready to be kitted out with a few weapons and decorations.
Step 1 | To make the guns on the wing, wrap a paper straw in black duct tape and cut into three even lengths. Wrap a small strip of chrome duct tape around them to bundle them together and attach to the left wing with some double sided tape. Repeat with another paper straw for the right wing.
Step 2 | Make the grill and headlights by sticking the appropriate shapes from page three of your template directly onto chrome duct tape and cutting them out. Cut the two slits marked on the grill and fold in half down the centre and along the tabs. Stick these to the front of your car using double sided tape.
Step 3 | For the silver piece on the bonnet of the car stick your template outline onto a piece of cereal box with chrome duct tape on the back, then score and cut out. Stick one tab on top of the other using double sided tape (so it’s not square), and then stick the finished shape in place with more double sided tape. My version in the pictures is a bit wonky looking because I haven’t used the template, but when using the template yours should come out looking spot on.
Step 4 | Make the snazzy silver piece with a spring on the sides of the car. Wrap a paper straw in chrome duct tape, then trim so it is slightly smaller in length. Stick two smaller pieces of straw covered in duct tape to each end of your straw by wrapping a small strip of tape around them. Make the spring by wrapping a pipe cleaner in duct tape, cutting it in half and then winding it around the straw. You’ll need two of these so make a second one and use the other half of the pipe cleaner to make the spring on the second one. Glue these pieces onto the sides using a hot glue gun, but wait until you have the wheels ready for gluing so you can do it all at once.
Step 5 | Stick the ‘Batman’ number plates to the front and rear of the vehicle using double sided tape.

Making the wheels
It’s time to make the wheels on your Batmobile. If you don’t have a mathematical instrument set you can roughly guess the middle point on your paper cup wheels, or measure it with a ruler. The problem with this is that you could still be slightly out which might make your Batmobile wonky when it rolls.
Step 1 | Cover a paper straw in chrome duct tape. Cut it in half and stick the two pieces to the bottom of your car using black duct tape.
Step 2 | Cut the tops off your small coffee cups using scissors.
Step 3| Find the centre of your wheels (on the base of the cup) using the divider tool in your mathematical instrument set. Do this by making your divider the full width of the diameter, measuring this and then halving it. Use your divider again (set to the size of the radius measurement this time) to make sure the middle point is even on all sides. Use one of the pointy ends to poke a hole in the exact middle.
Step 4 | Using your compass, draw two circles on the inside of the wheel one inside the other. Colour them in with your black and red markers so they look like the picture below.
Step 5 | Pop a bead onto your cake pop stick. Add a small dab from your hot glue gun to the back of the wheel and slide it on, gluing the bead firmly to the back of the wheel. Add another dab from the glue gun to the other side of the wheel and slide a second bead firmly in place. The beads should keep the wheel straight.
Step 6 | Slide your one-wheeled cake pop stick through the straw and add the second wheel to the other side. Use the same process of a bead, followed by the wheel with glue on the back, followed by a second bead. Repeat for the second set of wheels.
Allow a good 15 minutes for the glue to harden properly before testing out your Batmobile.

Your’e finished – your duct tape Batmobile is now ready to fight crime in Gotham city!


My kids love this fun new DIY toy. They can’t wait to check out The Lego Batman Movie too!
More fun craft ideas using tape:
• Make some toy binoculars and camera perfect for exploring
• Make some simple cardboard roll scribblers
• These washi tape magic wands are super easy to make
• Make some fun cardboard tube shakers
You can find tonnes more cool tape crafting ideas on our tape it up board on Pinterest.
Pin It:


This combines three some of my oldest girls favourite things – batman (yes, true!), LEGO, movies and craft. You’ve got her totally covered with this. Thanks for sharing info about the movie and giving us a project to try after school.
Haha! Sounds like she has good taste 🙂
This is awesome! You’ve given me Batman fever.
My five and three years olds are busting to see this movie and would LOVE this! We’ll have to make this after we’ve seen the movie 🙂
This is so so so so cool! Pinning immediately!